Java EE7 and Maven project for newbies - part 7 - #jpa2 and Unit testing using arquillian / WildflyAs 8.1 using a real Datasource (#postgresql)
Series
In the previous post (num 6) we discovered how we can unit test our JPA2 domain model, using Arquillian and Wildfly 8.1 In the previous post we made a simple configuration decision, we used the internal H2 database that is bundled with Wildfly 8.1 and the already configured Datasource (called ExampleDS). But what about a real DBMS? In this post we are going to extend a bit the previous work, use the same principles and
- test towards a running PostgreSQL in our localhost
- use some of the really nice features of the ShrinkWrap API, Arquillian Offers.
Pre-requisites
You need to install locally a PostgreSQL RBDMS, my example is based on a server running on localhost and the Database name is papodb.
Adding some more dependencies
Eventually we will need to add some more dependencies in our sample-parent (pom). Some of the arem related to Arquillian and specifically the ShrinkWrap Resolvers feature (more on this later).
So our we need to add to the parent pom. xml the following
Some notes on the above change:
- In order to avoid any potential conflicts between dependencies, make sure to define the ShrinkWrap BOM on top of Arquillian BOM
Now on the sample-services (pom.xml), the project that hosts are simple tests, we need to reference some of these dependencies.
Restructuring our test code
In the previous example, our test was simple, we we only used a certain test configuration. That resulted to single test-persistence.xml file and no web.xml file, since we were packaging our test application as a jar. Now we will upgrade our testing archive to a war. War packaging in JavaEE7 has become a first level citizen when it comes to bundling and deploying an enterprise application. The main difference with the previous example is that we would like to keep both the previous settings, meaning test using the internal H2 on wildfly, and the new setting testing towards a real RDBMS server. So we need to maintain 2 set of configuration files, and making use of the Maven Profiles feature, package them accordingly depending our mode. If you are new to Maven make sure to look on the concepts of profiles.
Adding separate configurations per profiles
So our test resources (watch out these are under src/test/resources) are now as illustrated below.
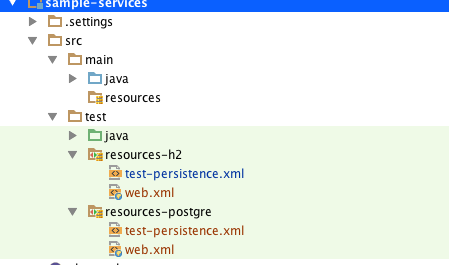
There are differences in both cases. The test-persistence.xml of h2 is pointing to the ExampleDS datasource, where the one on postgre is pointing to a new datasource that we have defined in the web.xml! Please have a look on the actual code, from the git link down below.
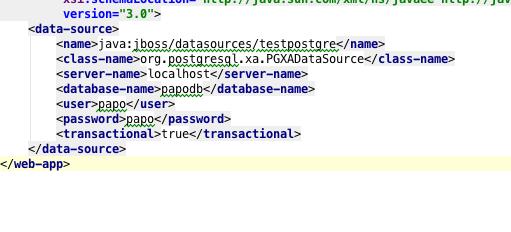
This how we define a datasource in web.xml
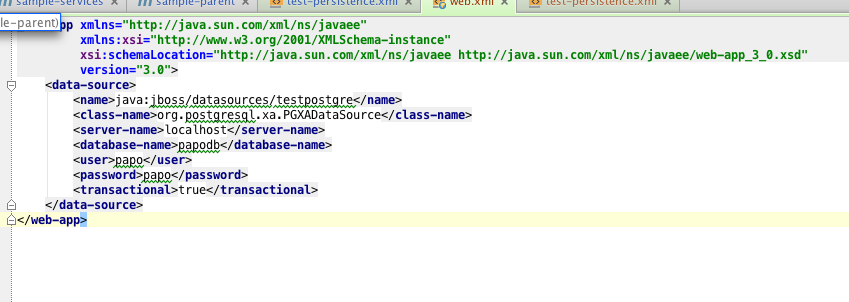
Notes on the above
- the standard naming in the JNDI name java:jboss/datasources/datasourceName
- the application server, once it reads the contents of the web.xml file, will automatically deploy and configure a new Datasource.
This our persistence.xml
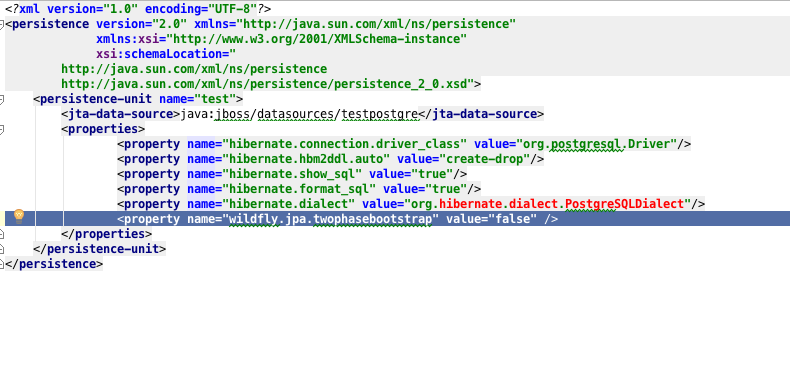
Notes on the above
- Make sure the 2 JNDI entries are the same both in the datasource definition and in the persistence.xml
- Of course the Hibernate Dialect used for postGresql is different
- T_he line that is highlighted is a special setting that is required for Wildfly 8.1 in cases that you want to deploy with one go, the datasource, the jdbc driver and the code. It hints the application server to initialize and configure first the datasource and then initialize the EntityManager. In cases that you have already deployed /configured the datasource this setting is not needed.
Define the profiles in our pom
In the sample-services pom.xml we add the following section. This our profile definition.
Depending on the profile actived, we instruct Maven to include and work with the xml files under a specific subfolder. So if we apply the following command
mvn clean test -Pdb2
Then maven will include the persistence.xml and web.xml under the resource-h2 folder and our tests will make use of the interall H2 DB. If we issue though
mvn clean test -Ppostgre
Then our test web archive will be packaged with data source definition specific to our local postgresql server.
writing a simple test
Eventually our new JUnit test is not very different from the previous one. Here is a screenshot indicating some key points.

Some notes on the code above:
- The Junit test and basic annotations are the same with the previous post.
- The init() method is again the same, we just create and persist a new SimpleUser Entity
- The first major different is the use of ShrinkWrap Api, that makes use of our test dependencies in our pom, and we can locate the JBDC driver as a jar. Once located ShrinkWrap makes sure to package it along with the rest of resources and code in our test.war.
- Packaging only the jdbc driver though is NOT enough, in order this to work, we need a datasource to be present (configured) in the server. We would like this to be automatic, meaning we don't want to preconfigure anything on our test Wildfly Server. We make use of the feature to define a datasource on web.xml. (open it up in the code).
- The application server, once it scans the web.xml will pick up the entry and will configure a datasource under the java:jboss/datasources/testpostgre name.
- So we have bundled the driver, the datasource definition, we have a persistence.xml pointing to the correct datasourc. we are ready to test
- Our test method is similar with the previous one.
We have modified a bit the resources for the H2 profile so that we package the same war structure every time. That means if we run the test using the -Ph2 profile, the web.xml included is empty, because we actually we don't need to define a datasource there, since the datasource is already deployed by Wildfly. The persistence.xml though is different, because in one case the dialect defined is specific to H2 and in the other is specific to Postgre.
You can follow the same principle and add a new resource subfolder, configure a Datasource for another RDBMS eg MySQL, add the appropriate code to fetch the the driver and package it along.
You can get the code for this post on this bitbucket repo-tag.
Reference
- Shrinkwrap resolver API page (lots of nice examples for this powerful API)
- Defining Datasources for Wildfly 8.1