Setup your Java Development Environment in Windows 7 (JAVA_HOME,ANT_HOME,MAVEN_HOME, SVN,Git) for newbies
UPDATE: I have changed the download links for some of the libs, since updated versions are available. The steps remain the same.
I have been receiving a lot of requests over the time, from students and people willing to experiment with the Java language, on providing a simple guide on how to setup a Java development environment, similar to the one I've written a year ago for Mac users. See here and here.
So, this post is mainly addressed to people new to Java development, that seek information about setting up their Windows (7 or similar) environment, with all the basic tools and settings, in order to start writing Java code and experiment with various tools and technologies in the Java ecosystem.
I am pretty sure there are numerous similar resources out there, I just thought to add one more. Hope you find it handy. It is really easy, so don't be afraid of this post's size, I just tried to elaborate on some simple steps, but for sure it is not rocket science and you don't have to be a hacker in order to complete all the steps. You may not need all the tools below, so it is not necessary to have them all installed at once.
Index
Setup Java JDK and JAVA_HOME (this is a must)
Setup Apache Ant and ANT_HOME (optional)
Setup Apache Maven and MAVEN_HOME (optional)
Setup SVN (subversion) support, using TortoiseSVN (optional)
Setup Git using Git Extensions (optional)
Setup a Java IDE, Netbeans or Eclipse (this is a must)
Setup Java JDK and JAVA_HOME
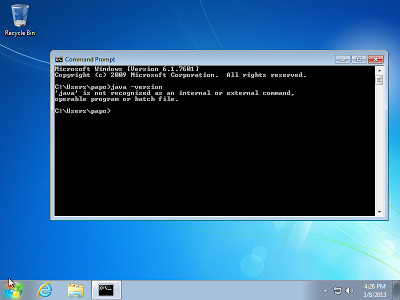
I assume that you have not installed any related tool before, and your system is clean from Java and other Java development tools. So I guess, if you open a Command Prompt and you type 'java -version_ you will get something like the following.
We need to install the Java Development Toolkit aka JDK, which is bundled with the Java Runtime Environment. At this moment, the latest JDK version is JDK 8 All you have to do is head to the main download page provided by Oracle ( here), and download the latest version that you will find. The direct link for the JDK 8 u18 is here.Start the installer and go through the steps. The images were taken when I was installing JDK7, the same applies with the latest.
Tip: One small tip or let's say a deviation from the installer that I prefer, is to change the installation path provided by the program to something easier to remember or even type in the command line tool. So instead of installing the JDK to C:\Program Files\Java\jdk8_18etc, I always choose something that looks like the following, 'C:\Java\jdk18'.
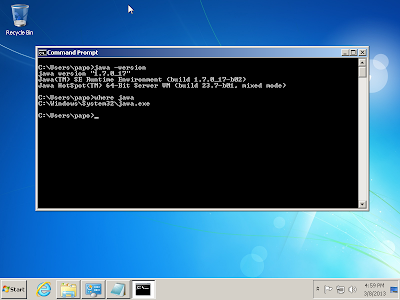
I do the same when the installer prompts me to install the JRE (java run time) and I provide the following path 'C:\Java\jre8'. When it is complete, I open a new command line and I re-type java -version as before. As you can see the installer has already done a good job and I have java in my environment. (You may use the wherecommand to find out which executable is loaded on the Path - (similar to whichin Unix) ).
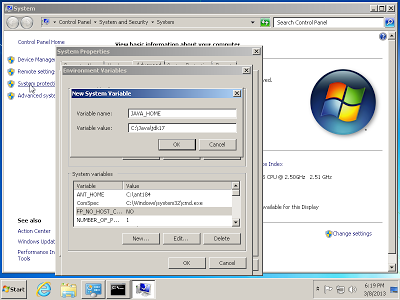
We are almost there, we just need to set, one more environment variable, that is very important by many tools that are based on Java or require Java to work. It is the famous JAVA_HOME variable and you must have heard it or seen it in various tutorials and setup resources. It is easy though!
Open your Advance System Settings ( Press Start, type in the search box V_i_ew Advanced System Settings, open it, select the tab Advanced and press the button in the bottom called Environment Variables'). Add a new system variable as it is illustrated below. The name is JAVA_HOME and the path is actually the path our JDKinstallation, in my case ''C:\Java\jdk18'.
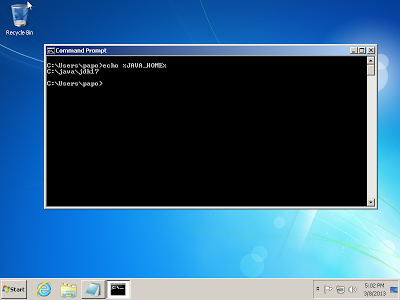
Press OK, and open a new Command prompt ( it is required). Type **echo %JAVA_HOME%**and you are done.
Congrats you have successfully set up the java run time and the jdk environment! Let's move on.
- Setup Apache Ant and ANT_HOME
Apache Ant is a popular build tool used in many Java projects and it is still needed in many cases when you need to setup some servers or complex projects. You can find more about Ant here. Installing Ant is easy, there is no fancy installer just a zip file you need to extract somewhere and add a similar variable like JAVA_HOME (see above) called ANT_HOME.
At the time being, the latest version of Apache Ant is, 1.9.4. and can be downloaded here. After downloading the zip file, I choose to extract the contents to a similar path like before C:\ant194'. (make sure that c:\ant184 is the root folder and then you have all the sub-folders like c:\ant184\bin'.
So, now we must set our ANT_HOME variable and add the ant executable to our windows Path so that we can invoke it in our command line by typing _ant'.
Setting ANT_HOME is similar to JAVA_HOME, add a new system variable named ANT_HOME and value the path where you have the ant zip extracted in my case C:\ant194'. See below

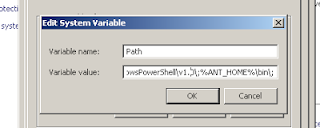
In order to add the ant command to our executable path we need to update the PATH system variable, in the very same window, as illustrated below, just hit Edit'. Go to the end of the line and add a new entry (all the entries are separated with ;). The path for the ant executable is **C:\ant194\bin**but we will use the ANT_HOME variable in order to be more flexible so we will add, **%ANT_HOME%\bin**''. See the image below.
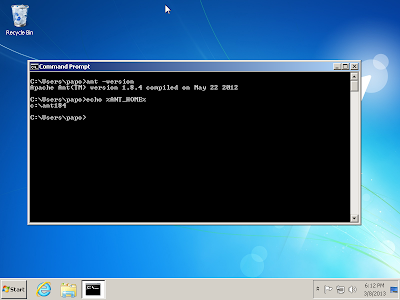
You are done, open a new Command Prompt, and type ant -version', or **echo %ANT_HOME%**you should get similar results are illustrated in the image below.
Congrats, you have successfully installed Apache Ant! Some Java IDE's have Apache Ant already pre-bundled (as we will see in a later section) but I truly believe it is better to be installed manually, it is cleaner and easier to maintain, update.
- Setup Apache Maven and MAVEN_HOME
Apache Maven is very popular tool among java developers, it does many things and has many uses. It is a building tool, a library dependency tool, a software project management and comprehension tool as it is indicated in the tool's site. You may find more about maven here. The installation of maven is similar to Apache's Ant, just a zip extracted somewhere and setting up a couple of variables + updating the system path. The latest version at the moment is 3.2.3 and can be downloaded here. There is already a short and handy setup guide provided in Maven's site (see here), I am going to write similar steps.
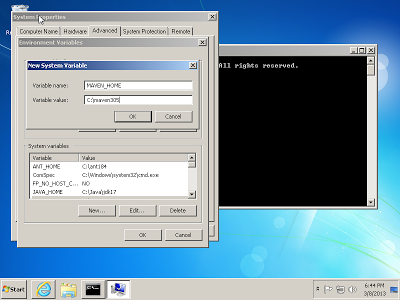
After downloading the zip file, I choose to extract the contents to a similar path like before C:\maven323'.
(make sure that c:\\maven323 is the root folder and then you have all the sub-folders like c:\\maven323\\bin.
So, now we must set our MAVEN_HOME variable and add the maven executable to our windows Path so that we can invoke it in our command line by typing mvn'.
Setting MAVEN_HOME is similar to JAVA_HOME or ANT_HOME, just add a new system variable named MAVEN_HOME and value the path where you have the maven zip extracted in my case C:\maven323'.
See below.
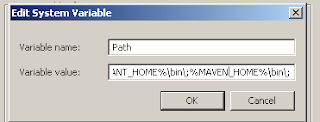
In order to add the mvn command to our executable path we need to update the PATH system variable like we did previously, in the very same window, as illustrated below, just hit Edit'. Go to the end of the line and add a new entry (all the entries are separated with ;). The path for the maven executable is **C:\maven323\bin**but we will use the MAVEN_HOME variable in order to be more flexible so we will add, **%MAVEN_HOME%\bin**''. See the image below.
You are done, open a new Command Prompt, and type mvn -version', or **echo %MAVEN_HOME%**you should get similar results are illustrated in the image below.

Congrats, you have successfully installed Apache Maven 3! Some Java IDE's have Apache Maven already pre-bundled (as we will see in a later section) but I truly believe it is better to be installed manually, it is cleaner and easier to maintain, use or update.
- Setup Subversion (version control) using Tortoise SVN
Subversion is a popular versioning system among Java developers. You may find further information about it here. There are numerous subversion clients that you may install in your computer. The original subversion command line client can be found here (for windows). All of the Java IDE's come with support of SVN either with pre-bundled clients or plug ins. I tend to use the clients offered by my IDE but I always want to have an extra client that gives me extra flexibility on certain things. I think that tortoise svn is an excellent choice for Windows users, it has full SVN support and excellent integration with the Windows file system.
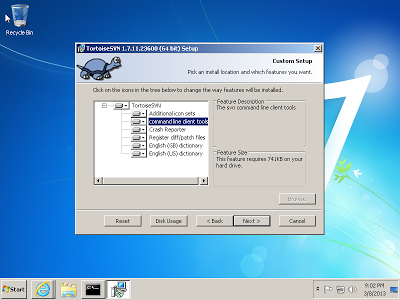
You find the latest version of the client here, current is 1.7.11 (compatible with SVN 1.7.8). Download the executable and follow the steps. The only addition on the default settings is that I select to install the command line tools as well, as illustrated in the image below.
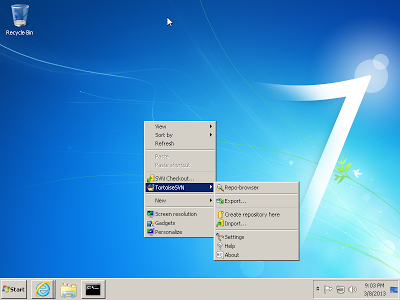
After completing the installation you can access Tortoise, using your right click in any folder, like the image below.
As I have already pointed out, most of the Java IDE's around offer SVN integration, out of the box but is always a good thing to have an extra client, in your windows shell. Tortoise is a great one, you can actually work with tortoise and skip your IDE's integration if you like so!
If you don't like Tortoise and you want to consider yet another client then I suggest you have a look on the free edition of SmartSVN.
- Setup Git (version control) using Git Extensions
Git, is another version control system that is becoming very popular among developers in general. In many cases it is replacing SVN, so there is a high chance you might be required to work with it, or work in projects that store their code on a remote Git repository or contribute to an open source project at GitHub. You may find more about Git here.
Git is the new kid on the block on popular versioning systems, so some tools or support still may not be so user friendly comparing to tools and clients of SVN. Git is also encouraging users to interact with it, using the command line interface. The stand alone git installation for windows can be found here. This will install the git client and support tools and you may start experiments with it, using the command line. If you want a more UI friendly way, then you may choose one of the free clients. (so, don't install the standalone client).
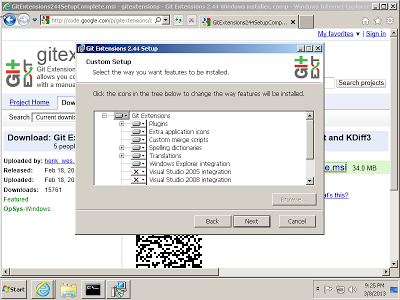
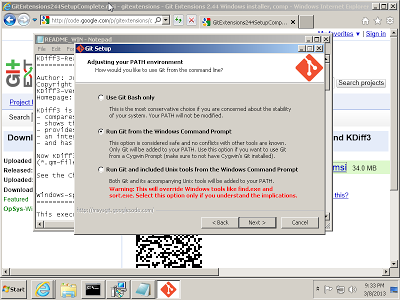
My choice at the time being is Git Extensions, which can be found here. The nice thing about Git Extensions is that with one download you get the native git client and all the nice UI tools, similar to Tortoise featured in the previous section. So you can just download the git extensions msi package, and follow the installer's step - just make sure to enable (when you are prompted to do so) the mygit support. See the image below.
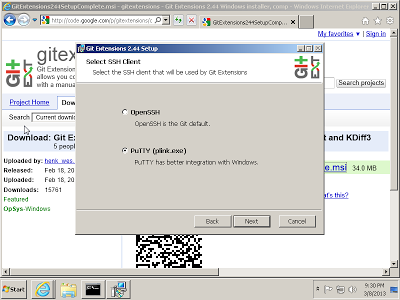
I have disabled any visual studio support, since I am not going to install this particular IDE. On the next step, I select Putty to be installed as my ssh client.
On the related prompt of the Git installer, about altering your System's Path, I always select the second one, so that the git command is added to my command line exec path. See the image below.
Continue with the rest of the installation and the various tools installed. The provided, default selections are safe to use.
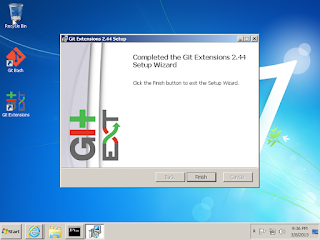
As you can see, by the end you are going to have the related icons, copied in your Desktop. Congrats you have full Git support on your development environment! Double click on the Git Extensions icons and set the final details like language of use and username / email to be used while interacting with git repositories.
6. Pick your Java IDE : )
Up until now we have installed a variety of tools towards setting up our Java Development environment. Since the JDK is already installed (from step one) we could actually jump to coding just by using our text editor of choice ( NotePad++, TextPad, NotePad, Ultra Edit etc) and invoking the javac and java commands from the command line. It is good to know that this is an option but I would highly recommend you start doing your experiments using a real IDE, and there are a lot of them in the Java development world and are considered very very powerful.
Netbeans
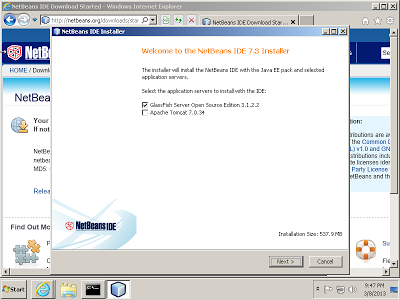
If you are a total newbie and you have just started using or learning Java, then your first stop, according to my opinion should be Netbeans. It is one of the best Java IDE's around, used by many professional java developers all around the world and is really targeting towards ease of use and productivity from the very beginning. You can find Netbeans (currently latest version 8.1) here. If you are about to work with some more advanced java stuff like the Java Enterprise edition (aka Java EE) then I think you should try downloading and install Netbeans with Java EE support and not the simple version. Upon installation it will prompt you about the bundled Java EE container (aka application server) that can install for you. My choice is GlassFish.
See the image below.
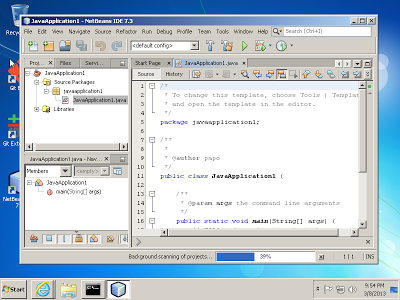
Continue with the rest of the installer prompts, your already existing JDK installation from step 1 should be picked accordingly by the setup script and be used by the IDE as well. The image below illustrates a fresh install of Netbeans running.
If you are looking for a quick guide or tutorial on using Netbeans, have a look here or have a look on numerous videos on youtube, here.
Eclipse
Eclipse is along with Netbeans, one of the most famous Java IDE's in the whole Java development community. its user (installation base) might be larger comparing to Netbeans and is usually the IDE of choice for hard core Java developers. I am currently an Eclipse user as well, but I personally don't find it a good fit for someone that is now starting to play with Java. There is a large community behind it, (as with Netbeans) numerous resources and support forums. It is not that hard, but if you are a new developer and you are still trying to make your way into basic stuff there is some possibility that you lose your way and get disappointed, something that we don't want :).
I don't want the above paragraph to be the start of a flame war especially for hardcore eclipse users, I am actually an eclipse user myself, I just think that Netbeans is more newbie user friendly, and it is critical that new java developers don't get disappointed after trying to complete their first assignment or task in Java.
The latest version of Eclipse currently is Eclipse 4.3 (codename Luna), and the downloads page can be found here. You can either select the Eclipse for Java or JEE developers download, depending on your assignments/tasks or interest. Eclipse does not pre-install any servers or support tools as such. All the extra functionality should be added afterwards through the Plugin system that offers. (See Eclipse Market place).
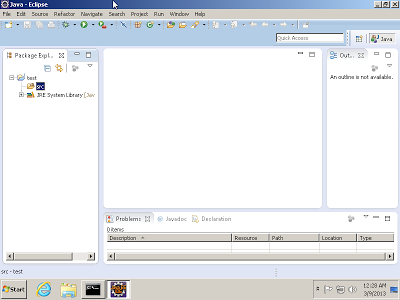
Eclipse does not have any installer, it comes as a zip file, all you have to do, is download the zip and extract the contents (like we did with Ant, or Maven). I usually pick a simple folder, like in previous section e.g. _C: \eclipseLuna' . Open the folder and you will find the executable (eclipse.exe). You should have something like the image below.
If you don't like Netbeans, neither Eclipse, you may try another popular option, Idea IntelliJ, it can be found here.(Update: This my IDE of choice lately)
That's it, happy coding!